
Best Export Settings - Why Does My Mix Sound Bad After Exporting? - FL Studio
4 chapitres
- Introduction and Video OverviewVideo PurposeThe video covers two main topics: how to export correctly in FL Studio and why exported audio sometimes sounds different from the mix inside FL Studio.Common Problem• Mixed audio sounds great inside FL Studio but terrible after exporting • Low end becomes weak and unclear • High end sounds sharp and fatiguing rather than clear and definedVideo PromiseThe creator will demonstrate proper export settings and explain solutions to the audio quality problem.StructureTwo distinct sections: export settings demonstration, then troubleshooting why exported audio sounds different.
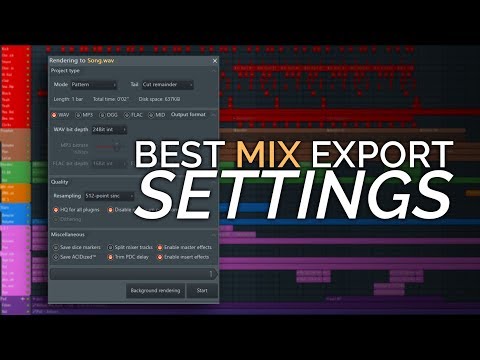
- FL Studio Export Settings and SetupPre-Export Steps• Press Ctrl + to select the entire song • Highlight song length by left-clicking and dragging • Go to File menu and select Export, then choose WAV file formatMode and Tail Settings• Set Mode to 'Song' to export the whole song • Check total time displayed to verify correct selection • Tail option determines if audio cuts exactly or leaves remainder for reverb decay • Use 'Cut Remainder' for mastering, 'Leave Remainder' for mixing to export reverb tailsFormat and Bit-Depth• WAV file provides best sound quality and is recommended 99 times out of 100 • Use 16-bit for CD distribution • 24-bit is widely accepted across streaming sites • 32-bit offers highest quality for archiving and future bit-depth reductionQuality Settings• Set quality as high as possible unless computer performance is limited • Quality above 64 provides excellent results • 512 is recommended but may be overkill • Enable 'Trim PDC delay' to ensure plugin delay compensation stays in time
- Master Effects and Rendering OptionsEssential Checkboxes• Enable Master Effects so all master effects are active during export • Enable Insert Effects to include all delays, reverbs, EQ, and compression • Dithering option only appears for 16-bit output and can be handled by mastering pluginsRendering Methods• Start rendering shows progress and allows cancellation via abort button • Background rendering frees up computer to do other tasks but takes longer • Start rendering is faster as it uses all computer resourcesQuality VerificationAfter rendering, open file explorer and drag the exported file back in to verify correct length and check for clipping or distortion.Mastering Plugin ControlLimiters like Slate FGX have built-in dithering and resolution settings, allowing full control over output quality without relying on FL Studio's dithering.
- Why Exported Audio Sounds DifferentRoot Cause99% of the time, the problem is computer audio processing and media player enhancements, not the mix or mastering skills.Player Enhancements Issue• Media players like Groove Music, Windows Media Player, and Beats have built-in equalizers and audio enhancements turned on by default • These enhancements boost, cut, or widen audio and affect playback quality • Disable all media player enhancements in settingsHardware Audio Drivers• Computer built-in audio outputs may have poor-quality drivers • Different devices sound different: laptop speakers sound worse than phone headphones or car audio • Using an audio interface bypasses poor computer audio management and restores qualitySolution and Reassurance• The issue is likely a technical hardware or software problem, not mixing mistakes • Don't blame your skills if exported audio sounds bad compared to FL Studio playback • Test on multiple devices to confirm: phone, headphones, car audio, or external audio interface




